
Git merge is a command in the Git version control system that is used to integrate changes from one branch to another. This is typically used when you have a feature branch. And you want to merge changes from that branch back into the main branch or master branch.
When you merge two branches, Git will take the changes from one branch and apply them to the other branch. If there are any conflicts between two branches, Git will highlight them and ask you to manually resolve them.
The syntax for merging a branch in Git is as follows:
git merge <branch>
Here, <branch> is the name of the branch you want to merge into the current branch. For example, if you are on the master branch and you want to merge the changes from the feature branch, you would run the following command:
git merge feature
Then Git will attempt to merge the changes from the feature branch into the master branch. If there are no conflicts, Git will automatically merge the changes. If there are conflicts, Git will ask you to resolve them manually before proceeding with the merge.
Merging is an essential feature of Git. And it allows developers to work on multiple branches at once without interfering with each other’s work. With Git Merge, you can easily combine changes from different branches into a single branch and keep your codebase up to date.
To download Git visit https://git-scm.com/download/win
How Git Merge Works?
Git merge is a command that allows you to combine changes from two or more different branches in Git. When you merge two branches, Git will create a new commit that incorporates the changes from the two branches.
Here is an overview of how the Git merge process works:
- Identify the branches to merge: You will first need to determine which branches you want to merge. This can be done using the git branch command to view all available branches, and the git checkout command to switch to the branch you want to merge into.
- Start the merge: Once you have identified the branches to merge, you can start the merge process using the git merge command. This will merge the specified branch into your current branch.
- Resolve conflicts: If there are any conflicts between the two branches being merged, Git will prompt you to resolve them. Conflicts occur when Git is unable to automatically merge changes from both branches. You will need to manually edit the affected files and choose which changes to keep.
- Commit the merge: Once all conflicts have been resolved, you will need to commit the changes to complete the merge process. Git will create a new commit that includes the changes from both branches.
- Push the changes: Finally, you will need to push the merged changes to the remote repository using the git push command. This will update the remote repository with the new changes.
Overall, Git merge allows you to combine changes from multiple branches, which is an essential feature of Git for managing complex software projects with multiple contributors. By understanding how Git merge works, you can better manage the Git workflow and avoid errors that can occur during the merge process.
Learn More About Most Used Basic Git Commands:
Readying For The Merge
Before you can perform a Git merge, you need to ensure that your repository is ready for the merge. Here are some steps to follow:
………………………………………………………………………………………………………………………….
- Ensure your working directory is clean: It is best to start with a clean working directory. This means that there should be no uncommitted changes in your repository. You can check the status of your repository using the git status command.
- Fetch the latest changes: It is always a good idea to fetch the latest changes from the remote repository before starting a merge. This will ensure that you have the latest changes from other contributors in your repository. You can use the git fetch command to fetch the latest changes.
- ‘Checkout’ the branch you want to merge into: You need to ‘checkout’ the branch that you want to merge into. For example, if you want to merge changes from the feature branch into the main branch, you need to ‘checkout’ the main branch using the git checkout main command.
- Pull changes from the branch you want to merge: It is a good idea to pull changes from the branch you want to merge before performing the actual merge. This will ensure that you have the latest changes from the branch you want to merge. You can use the git pull command to pull changes.
- Resolve any conflicts: When you merge two branches that have conflicting changes, you need to resolve those conflicts before committing the merge. Git will tell you which files have conflicts and prompt you to resolve them. You can use a text editor to resolve the conflicts, save the changes, and then use the git add command to stage the changes.
………………………………………………………………………………………………………………………….
By following these steps, you can ensure that your repository is ready for the merge and minimize the chances of encountering issues during the merge process.
Fast Forward Merge
A fast-forward merge is a type of Git merge that occurs when the target branch has not diverged from the source branch. This means that there are no new commits on the target branch since the time the source branch was created. In this case, Git can simply move the target branch pointer to the latest commit on the source branch, which is the same as fast-forwarding a video to the end.
Here are the steps to perform a fast-forward merge:
- Check out the target branch: You need to be on the target branch where you want to merge the changes. For example, if you want to merge the changes from the feature branch into the main branch, you need to check out the main branch using the git checkout main command.
- Merge the source branch: Use the git merge command to merge the source branch into the target branch. Since this is a fast-forward merge, Git will simply move the target branch pointer to the latest commit on the source branch. The command to perform a fast-forward merge is:
sql
git merge source_branch
In this example, you would replace source_branch with the name of the branch you want to merge, which is the feature.
- Review the changes: Use the git log command to review the changes that were merged into the target branch. You can also use a Git visualization tool, such as Gitk or GitKraken, to review the changes visually.
- Push the changes: If you are working with a remote repository, you need to push the changes to the remote repository using the git push command.
That’s it! A fast-forward merge is a simple and straightforward way to merge changes from one branch into another when there are no conflicts.
Example of a fast-forward merge in Git:
………………………………………………………………………………………………………………………….
- First, create a new branch called “new-feature” and switch to it:
$ git checkout -b new-feature
- Make some changes to your code and commit them to the “new-feature” branch:
$ git commit -am "Added new feature"
- Make some more changes and commit them again:
$ git commit -am "Fixed bug in new feature"
- Switch back to the main branch:
$ git checkout main
- Merge the changes from the “new-feature” branch into the main branch using a fast-forward merge:
$ git merge new-feature
Assuming that the “new-feature” branch has a linear history (that is, no other branches were created from it), Git will perform a fast-forward merge. This means that changes made to the “new-feature” branch will be applied directly to the main branch without creating a new merge commit. The result is a main branch that contains the changes from both commits on the “new-feature” branch.
Note that a fast-forward merge is only possible if there are no conflicting changes between the two branches. If there are conflicting changes, Git will not be able to do a fast-forward merge and will instead create a new merge commit integrating the changes from both branches.
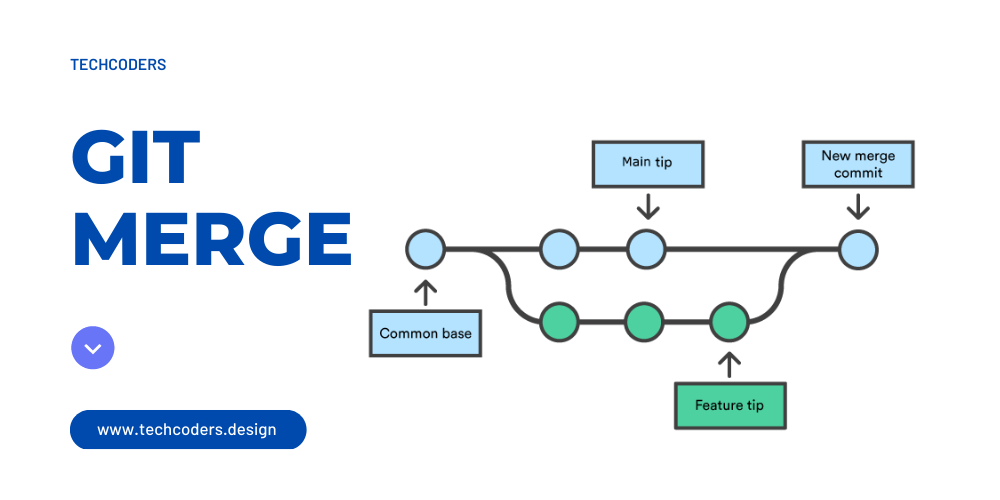
3-way merge
A 3-way merge is a type of Git merge that occurs when the branch being merged has a different history, meaning that both the current branch and the branch being merged have conflicting changes. In this case, Git needs to create a new merge commit to reconciling the differences between the two branches.
A 3-way merge involves three different versions of a file: the version from the current branch, the version from the branch being merged, and a common ancestor that both versions are based on. Git uses these three versions to automatically resolve conflicts and create a new merge commit that incorporates the changes from both branches.
Here’s an example of a 3-way merge:
- Create a new branch called “feature-branch” and switch to it:
$ git checkout -b feature-branch
- Make some changes to a file and commit them:
$ git commit -am "Made changes to file on feature-branch"
- Switch back to the main branch:
$ git checkout main
- Make some changes to the same file that conflict with the changes made in step 2 and commit them:
$ git commit -am "Made conflicting changes to file on main branch"
- Merge the “feature branch” into the main branch using a 3-way merge:
$ git merge feature-branch
At this point, Git will attempt to automatically resolve the conflicts between the two versions of the file. If it is unable to automatically resolve the conflicts, it will prompt you to manually resolve them. Once all conflicts are resolved, Git will create a new merge commit that incorporates the changes from both branches.
Overall, a 3-way merge is a more complex process than a fast-forward merge. And it requires more attention and care to resolve any disputes that may arise. However, it is an essential part of Git’s branching and merging functionality. And allows developers to work on separate branches without worrying about overwriting each other’s changes.
Learn More: How to delete a branch in git
Resolving conflict
In Git, conflicts can occur when you attempt to merge two branches that have changes to the same file or files. When this happens, Git will notify you of the conflict and prompt you to resolve it manually. Here are the steps to resolve conflicts in Git:
First, run the following command to check which files have conflicts:
git status
Open the files that have conflicts in a text editor, and look for the conflict markers. Conflict markers are special annotations that Git adds to the file to indicate where the conflicts occurred. They look like this:
<<<<<<< HEAD
Changes from the current branch
=======
Changes from the other branch
>>>>>>> other-branch
- The section between <<<<<<< HEAD and ======= represents the changes made in the current branch, while the section between ======= and >>>>>>> other-branch represents the changes made in the other branch.
- Edit the file to resolve the conflicts. You can choose to keep one of the changes or combine them both as required.
- After resolving the conflict, save the file and add it to the staging area using the following command:
git add <file>
Once all the conflicts have been resolved, run the following command to commit the changes:
git commit -m "Merge conflicts resolved"
Finally, push the changes to the remote repository using the following command:
git push
It is important to note that conflicts can be complex. And it may require careful analysis to ensure that they are resolved properly. In general, it’s best to communicate with your team members and try to avoid conflicts by working on different parts of the codebase or using feature branches. However, when conflicts do arise, Git provides a robust set of tools to help you resolve them efficiently.
How Conflicts Are Presented?
When Git encounters a conflict during a merge, It will edit the content of the affected files with visual indicators that mark both sides of the conflicted content. These visual markers are: <<<<<<<, =======, and >>>>>>>. It’s helpful to search a project for these indicators during a merge to find where conflicts need to be resolved. Here is some content not affected by the conflict.
<<<<<<< main
this is conflicted text from main
=======
this is conflicted text from feature branch
>>>>>>> feature branch;
Generally, the content before the ======= marker is the receiving branch, and the part after is the merging branch.
Once you’ve identified the conflicting sections, you can go in and fine-tune the merge to your liking. When you’re ready to complete the merge, all you need to do is run “git add” on the conflicting files to tell them they’re resolved. Also, you can run a normal git commit to generate the merge. This is the same process as committing a normal snapshot, which means it’s easier for normal developers to manage their own merges.
Keep in mind that merge conflict will arise only in case of a three-way merge. And conflicting changes are not possible in fast-forward merging.
Outline
That’s a great summary! Merging is a really important aspect of using Git for version control. And understanding the difference between fast-forward and 3-way merging will allow developers to make more informed decisions about how to integrate changes from different branches. Picking up may help. Some other key facts about the git merge command include:
- Merge creates a new commit that contains changes from one or more branches to the current branch.
The git merge command can be used to perform both fast-forward and 3-way merges. - Fast-forward merging is possible when there is no new commit in the current branch since the branch is being merged. And the merge can be accomplished by advancing the current branch pointer to the branch being merged.
- A 3-way merge is necessary when the branches being merged are different. It means they have different commits that cannot be reconciled by just moving the branch pointer.
- Conflicts can arise during a merge when changes made in one branch conflict with changes made in another branch. In such cases, Git will ask the user to manually resolve the conflicts before the merge is completed.
- The git merge command has many options and flags that can be used to customize how the merge is performed. For example, the ‘–no-commit’ flag can be used to tell Git to merge. But do not automatically create a new commit, allowing the user to review the changes before committing them.
Learn More: How To Delete A Repository In GitHub,